


 2025-08-14
 BEST
BEST
You should plan your rigid flex pcb budget with careful study and clear cost checks. The global rigid flex market is growing fast. It may reach USD 2.5 billion by 2032. This growth comes from high-reliability uses and new technology. The main cost parts are layer count, materials, surface finish, and how hard it is to make.
New rigid flex trends like making things smaller and using new materials mean you must focus on cost checks and keeping records right. This helps you avoid surprise costs. Careful study and comparing prices help you control your spending.
Key Takeaways
- Make your rigid flex PCB budget by knowing what makes costs go up, like how many layers there are, what materials you use, and how hard the design is. Work with your manufacturer early so you can get help with your design, stop mistakes, and not have to fix things later. Pick your materials carefully by thinking about how well they work and how much they cost; only use pricey flexible materials when you really need them. Keep your design simple with fewer layers and easy features to save money and make production safer. Buy more boards at once if you can, so you get discounts and pay less for each board.
Rigid Flex PCB Manufacturer-Bestfpc
Rigid Flex PCB Stackup
It is important to know how stackup choices change the cost. Bestfpc’s rigid-flex stackup puts rigid and flexible layers together in one board. This means you need fewer connectors and parts. You spend less time putting it together. There are also fewer places where things can go wrong. You pay more at first for special materials like no-flow prepreg and for careful alignment. But you save money later because assembly is easier and the board lasts longer.
- Rigid-flex PCBs can cost up to seven times more than regular rigid PCBs. This is because they use special materials and steps.
- Bestfpc says to use FR-4 for rigid parts when you can. This helps keep costs down.
- If you use fewer layers and talk with your manufacturer early, you can save money and make building easier.
- Advanced design software helps you plan your rigid-flex board better. This helps you avoid surprise costs.
Rigid-flex boards last a long time and work well. This makes the higher starting price worth it, especially for things like planes, medical tools, and defense.
Rigid Flex PCB Design
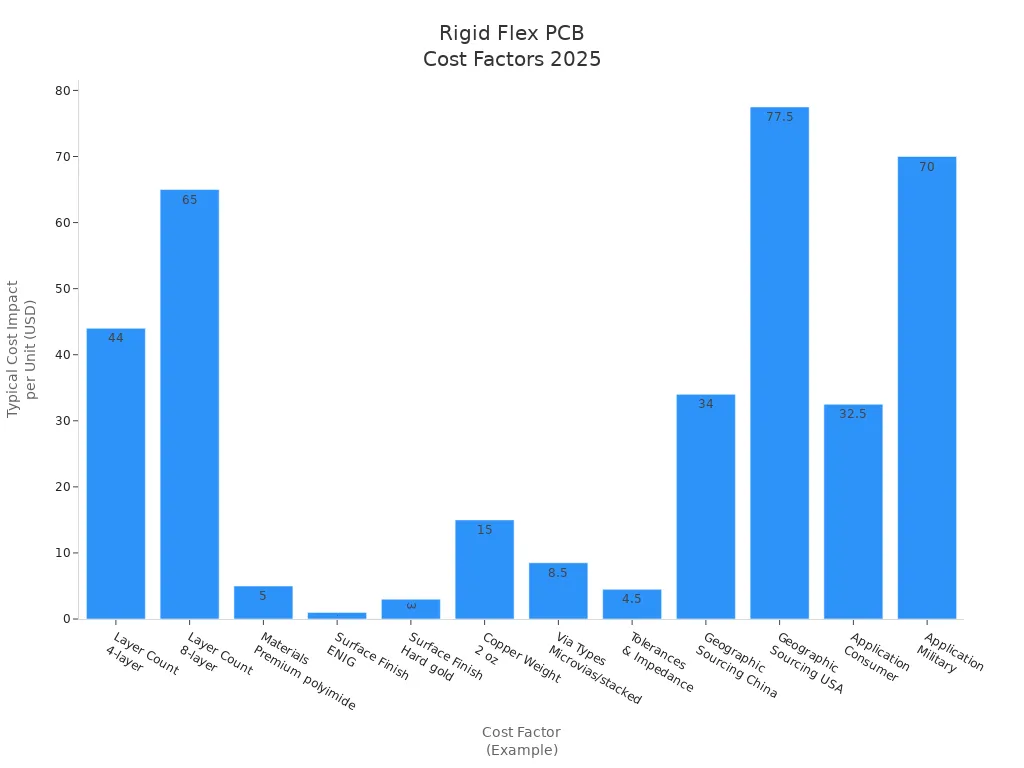
Your design choices affect both the design cost and the total project cost. If your design is more complex, it costs more. This is because it takes more time and extra steps to make. If you add special features or need something unique, your price can go up by 50% to 200%.
Bestfpc lets you pick from 1 to 10 flexible layers and up to 40 rigid layers. You can choose bonded or air gap options. These choices change how hard the design is and how much it costs. The materials you pick, like polyimide flex cores and copper thickness, also matter. If you add things like EMI/RF shielding, blind and buried vias, or controlled impedance, the cost goes up.
Tip: Make your rigid-flex design simple if you can. Fewer layers and basic features help you save money.
Soft and Hard Circuit Board Materials
Picking the right materials is a big part of the cost. Bestfpc uses polyimide for flexible parts and FR-4 for rigid parts. Polyimide costs more than normal PCB materials. But it bends better and handles heat well. You can also pick different copper thicknesses and coverlay types. Stiffeners made from polyimide, FR-4, stainless steel, or aluminum make the board stronger. But they also make it cost more.
| Material Type | Typical Use | Cost Impact |
|---|---|---|
| Polyimide | Flexible sections | High |
| FR-4 | Rigid sections | Moderate |
| Stainless Steel/Aluminum | Stiffeners | High |
Choosing the best materials for your board helps you get good performance and control the cost.
Rigid Flex PCB Manufacturing process
Making rigid-flex PCBs has many steps that change the cost. Bestfpc uses special materials like no-flow prepreg. These cost more than normal ones. The process needs careful alignment and bonding of the rigid and flexible parts. You should think about the number of layers, bend radius, and surface finish.
Steps in making include:
- Lining up layers and pressing them together
- Etching and using lasers to drill holes
- Testing for controlled impedance
- Putting everything together and checking it
How many boards you order also matters. If you order more, each board costs less.
Rigid Flexible Circuit Boards Assembly
How hard it is to put the board together changes the cost and how well it works. Bestfpc’s rigid-flex boards need fewer connectors and cables. This makes assembly easier and lowers the chance of problems. You can use SMT and through-hole methods. But if the assembly is more complex, it takes more time and resources.
Note: Simple assembly steps help you save on work costs and lower mistakes.
Rigid Flexible PCB Boards Cost
You need to think about many things when planning your rigid-flex PCB budget:
- Material choice: Polyimide and special stiffeners cost more.
- Layer count: More layers mean higher prices.
- Board size: Bigger boards use more material and take longer to make.
- Design complexity: Special features and tight rules raise costs.
- Production volume: Making more boards lowers the cost for each one.
- Special processes: Laser drilling, controlled impedance, and extra tests add to the cost.
The total price of your rigid-flex board includes the first cost to make it and the money you save later from easier assembly and better reliability.
Wonderful PCB Logistics From Bestfpc
Bestfpc helps your project with fast and smooth shipping. You get your boards quickly and on time. This keeps your project moving. Bestfpc knows a lot about rigid-flex boards. Your boards arrive tested and ready to use. You do not have to worry about delays or extra costs from shipping mistakes or bad quality.
When you work with Bestfpc, you get easy shipping and expert help for your rigid-flex project.
Rigid Flexible PCB Boards Cost Analysis
Rigid Flex vs Rigid PCB
You pay more at first for rigid flex PCBs than regular PCBs. Rigid-flex PCBs need special designs and polyimide materials. They also use advanced ways to make them. Regular PCBs use FR-4 and old methods, so they cost less for each board. But rigid-flex PCBs save money when you put them together. You do not need as many connectors or cables. This makes your system simpler and uses fewer parts. Over time, rigid-flex PCBs work better and need less fixing. In tough jobs like aerospace, you save money later and get better results. For things like phones and computers, regular PCBs are still used a lot because they are cheaper to make in big numbers.
- Making rigid-flex PCBs costs more than regular PCBs.
- Putting rigid-flex PCBs together costs less because you use fewer connectors.
- Rigid-flex PCBs save money over time because they last longer.
Rigid Flex vs Flex PCB
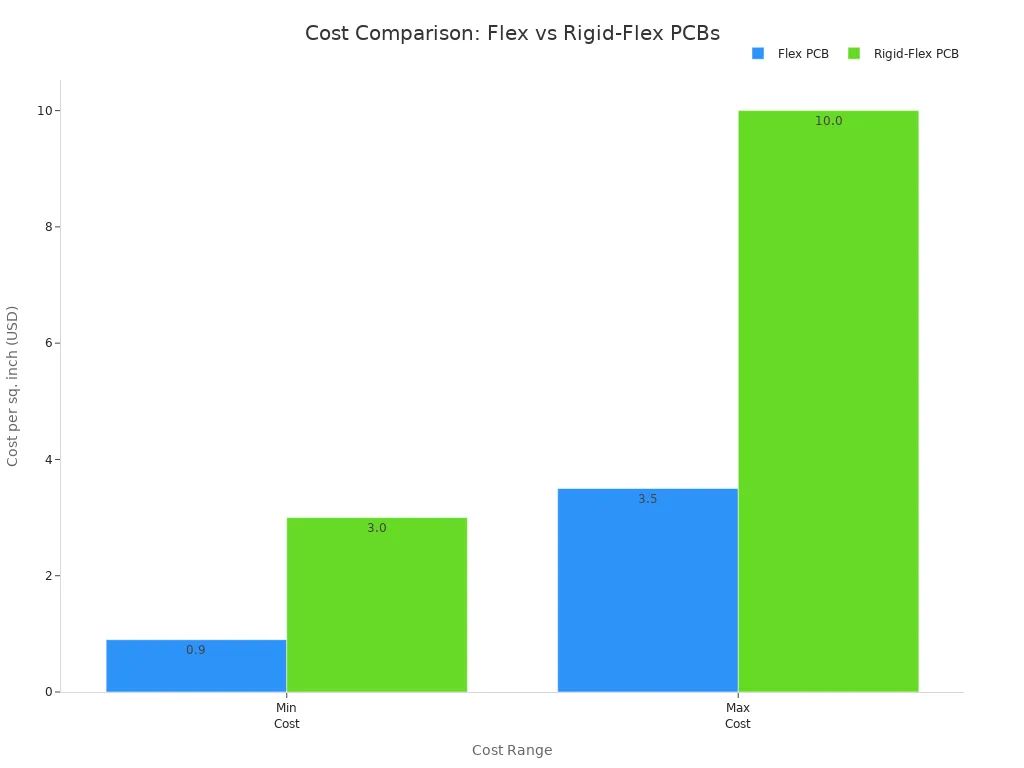
You see a big price gap between rigid-flex and flex PCBs. Flex PCBs use polyimide films and need special drilling. Rigid-flex PCBs mix rigid and flexible parts, so making them is harder. This makes rigid-flex PCBs cost 50% to 200% more than flex PCBs. The table below shows how the costs compare:
| PCB Type | Material Cost Factors | Manufacturing Complexity | Typical Cost Range (per sq. inch) | Cost Impact Summary |
|---|---|---|---|---|
| Flexible PCB | Polyimide films, coverlay, special drilling | Dedicated equipment, extra steps | $0.90 - $3.50+ | Lower upfront cost, needs special handling |
| Rigid-Flex PCB | Rigid + flex substrates, precise transition zones | Most complex, lower yield rates | $3.00 - $10.00+ | 50-200% higher cost, improved reliability, lower lifecycle cost |
Rigid-Flex PCBs vs Modular Solutions
When you look at rigid-flex PCBs and modular solutions, you find good and bad points. Rigid-flex PCBs save space and use fewer connectors. This lowers the cost to put them together and fix them. Modular solutions use separate boards, which seem cheaper at first. But they are harder to put together and can break more easily. Rigid-flex PCBs cost more at the start, but they last longer and fit better in small spaces.
Tip: Use the same materials and fill up panels to save money with rigid-flex PCBs.
Total Cost Considerations
When you check all costs for rigid-flex projects, you see more than just making the boards. You save money on design, connectors, cables, and work to put them together. Rigid-flex PCBs need only one test and one part number. This makes ordering easier and cheaper. They also work better, so you fix them less and lose less time. You save more money over time because they last longer and weigh less. This makes shipping and packing cheaper. If you make a lot of boards, each one costs less. This makes rigid-flex PCBs a good choice for big projects.
When you buy rigid-flex PCBs, you see that companies in China charge much less than local ones. Local makers ship faster and help more, but they cost two to three times more. China is better for big orders. Local shops are good for testing and small batches. This cost check helps you pick the best company for your needs.
Budgeting Strategies
Design Optimization
You can save money on rigid flex projects by making smart design choices. Start by using hybrid materials. Put expensive flexible laminates only where you need them. Use cheaper rigid materials in other places. Pick adhesive-less flexible layers to make the board thinner and easier to bond. This helps lower both design and manufacturing costs.
Here are steps to help you design for lower costs:
- Use fewer flexible layers. If you go from three to one flexible layer, you can cut material costs by 15-25%.
- Do not use tight bend radii. Make sure the bend radius is at least ten times the flexible layer thickness. This stops defects.
- Pick bigger annular rings and teardrop vias. These features lower the chance of rework and make the board more reliable.
- Fit as many boards as you can on each panel. This can boost yield by up to 20% and cut waste.
- Choose cheaper surface finishes. Pick HASL instead of ENIG when you can. This saves 10-15% on finishing costs.
- Use the same material thicknesses and reuse scrap material if you can.
- Plan for bigger production runs. This helps you get volume discounts.
Tip: Work with skilled manufacturers early. They can give advice on design, suggest different materials, and help you balance cost and quality.
Material Selection
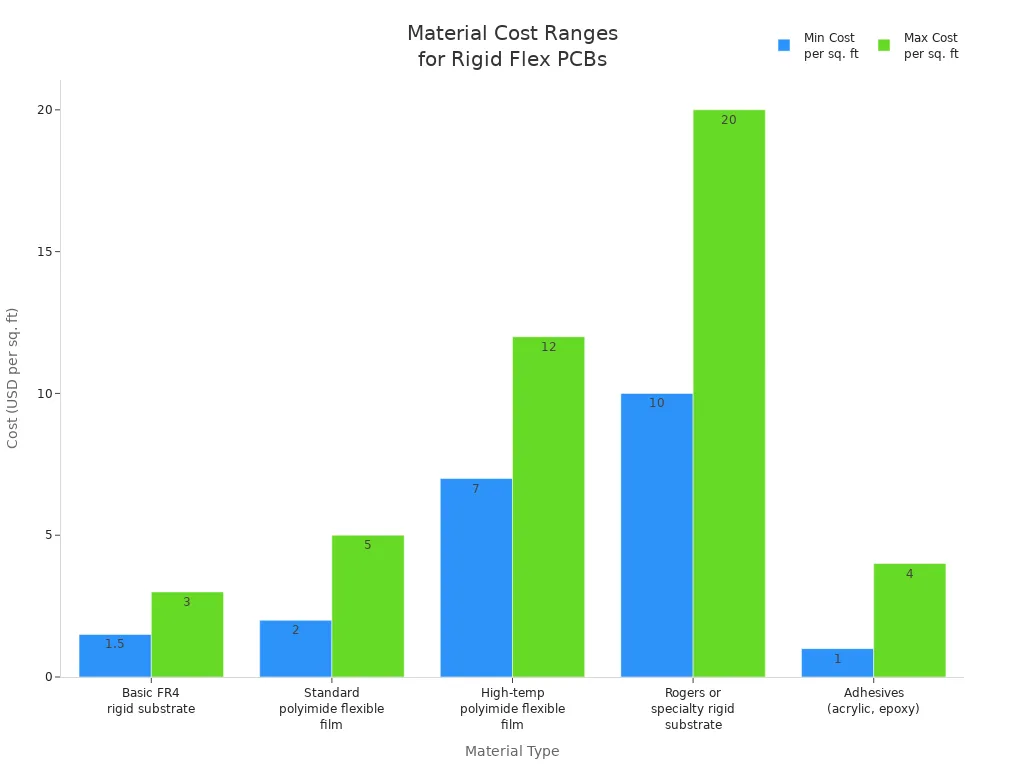
Picking the right materials is very important for your total cost. If you choose materials early, you avoid expensive redesigns and delays. You should pick materials that give good performance but do not cost too much.
| Material Type | Typical Cost (USD/sq. ft) | Performance Characteristics |
|---|---|---|
| Basic FR4 rigid substrate | $1.5 – $3 | Standard mechanical and electrical |
| Standard polyimide flexible film | $2 – $5 | Good flexibility and thermal endurance |
| High-temp polyimide flexible film | $7 – $12 | Extreme temperature and chemical resistance |
| Rogers or specialty rigid substrate | $10 – $20 | High-frequency, low loss electrical performance |
| Adhesives (acrylic, epoxy) | $1 – $4 | Bonding strength and flexibility |
Pick cheaper base materials like PET for flexible sections that are not critical. Use thinner copper weights, such as ½ oz instead of 1 oz, to save on material and etching costs. Do not use too much coverlay or stiffeners. Only add them where needed and pick low-cost options. Use materials your manufacturer already has. This makes lead times shorter and keeps costs steady. Remember, rules for the environment can make raw materials cost 5-10% more. High-performance materials cost more at first but can lower failures and warranty claims, saving money over the product’s life.
Manufacturer Collaboration
Working with your manufacturer early helps you control costs. If you include your fabricator in the design stage, you get free design reviews. These reviews catch costly problems like non-standard materials or tight tolerances. This can save you 10-15% on redesign costs.
Manufacturers help match your design to their production skills. They can suggest better materials and stack-ups. This stops failures and expensive changes. Talking openly lowers mistakes, makes things run smoother, and makes sure your design can be built. By teaming up from the start, you cut down on rework and get a solution that fits your needs and budget.
Note: Working with your manufacturer early means fewer mistakes, better material picks, and lower total cost.
Cost Management Tools
You can use different tools to keep costs low during your rigid flex project. Batch processing and automation, like Automated Optical Inspection (AOI), can cut inspection time by up to 70% and lower rework costs by 25%. Panelization software helps you arrange boards better, so scrap drops from 10% to less than 5%.
Use statistical process control and make test needs simple. Finding problems early lowers rework and keeps your project on budget. Make your testing and quality checks the same every time to stop costly failures. Use cost management software to watch spending, compare supplier prices, and track project steps. These tools help you make smart choices and avoid surprise costs.
Callout: Changing a six-layer board to four layers with help from the manufacturer saved one project 28% on total cost.
Volume Discounts
Ordering more rigid flex boards at once saves you a lot of money. Manufacturers give bulk discounts for big orders, so each board costs less than in small batches. Bigger orders lower setup and tooling fees, and material and labor costs per board.
| Order Quantity | Cost per Unit (Flex-Rigid PCB) | Savings vs. Small Batches |
|---|---|---|
| 10–50 units | $25–$35 | N/A |
| 100–500 units | $18–$22 | 25–30% |
| 1,000+ units | $12–$15 | 40–50% |
Ask for volume discounts from your suppliers for materials, parts, and manufacturing. Making more boards lets you spread fixed costs over more units, which saves money. But think about storage and inventory costs, and the risk that your design might become outdated before you order a lot.
Tip: Combine orders and plan for bigger runs to get the best savings and lowest cost per board.
Tips and Examples
Case Study
You can learn a lot from real projects. One satellite company had strict space and weight rules. The team picked rigid flex circuit boards to fix these problems. The first cost was high because the design was hard and needed special materials. The team worked with the manufacturer from the start. They got free design reviews and reused old modules. These steps helped cut redesign costs and mistakes. The final design saved space and weight. This made launch costs lower. The satellite also worked better and lasted longer. The project showed that paying more at first can save money and give better results later.
Successful budgeting strategies used in this project:
- Work with your manufacturer early for free design reviews.
- Use old rigid flex designs or modules to save time and avoid errors.
- Pick open-source design tools to save on license fees.
- Try semi-flex boards if you do not need full flexibility. This can cut material and making costs by 20-40%.
- Lower layer count and make the design simple to reduce defects.
- Use hybrid designs to balance cost and how well it works.
Tip: Teamwork and smart design choices help you save money and get better results.
Common Pitfalls
You may run into some common mistakes when planning your rigid flex circuit board budget. These mistakes can cause delays, extra costs, and problems with how well it works.
- Unbalanced stack-ups can make boards bend or break apart.
- Picking too many or too few materials can slow down orders or cost too much.
- Uneven copper can cause problems with signals and making the board.
- Bad communication or missing info can lead to making errors and fixing work.
- Sharp bends in flex areas can crack copper.
- Putting vias in flex zones can cause breaks.
- Missing stiffeners under flex parts can hurt solder joints.
- Not checking if materials work together can cause boards to bend or break.
- Routing traces along the bend makes stress higher.
- Wrong layer stack-up in CAD can cause making problems.
- Not checking the smallest bend radius can cause breaks.
- Bend angles over 90° can damage the board.
- Overlapping traces in flex areas make the board less flexible and thin out copper.
- Not enough space between holes and flex can cause problems.
- Small holes are harder and cost more to make.
- Not enough space between drill and copper can cause shorts and trouble.
- Solid ground planes in flex areas make the board stiff and add stress.
How you can avoid these pitfalls:
- Make layers even or ask your maker for help.
- List key material needs and be open to other choices.
- Spread copper evenly and use dummy fills if needed.
- Give clear stack-up diagrams with all details.
- Use slow bends with a bend radius at least ten times the flex thickness.
- Keep vias only in rigid zones.
- Put stiffeners under parts in flex areas.
- Follow your maker’s material rules.
- Route traces across the bend with curved lines.
- Mark rigid and flex layers clearly in your stack-up manager.
- Follow IPC-2223B rules for bend radius.
- Keep bend angles at 90° or less.
- Stagger traces in flex areas.
- Keep at least 50 mil between holes and flex.
- Use the right space between drill and copper.
- Use cross-hatched ground planes in flex areas.
Note: Careful planning and clear talks with your manufacturer help you avoid costly mistakes.
You can plan your rigid flex PCB budget in 2025 by using simple steps. First, know what makes the cost go up, like how many layers you need, what materials you pick, and how many boards you want. Check prices to see how each thing changes your budget. Good planning helps you stop extra costs and delays. Make a list with your PCB details, BOM, design files, and any special needs. Talk often with your manufacturer and team to find problems early and keep things moving. Watching costs closely gives you better results and fewer surprises.
.png)
.png)
.png)
.png)

.png)

