


 2025-10-27
 BEST
BEST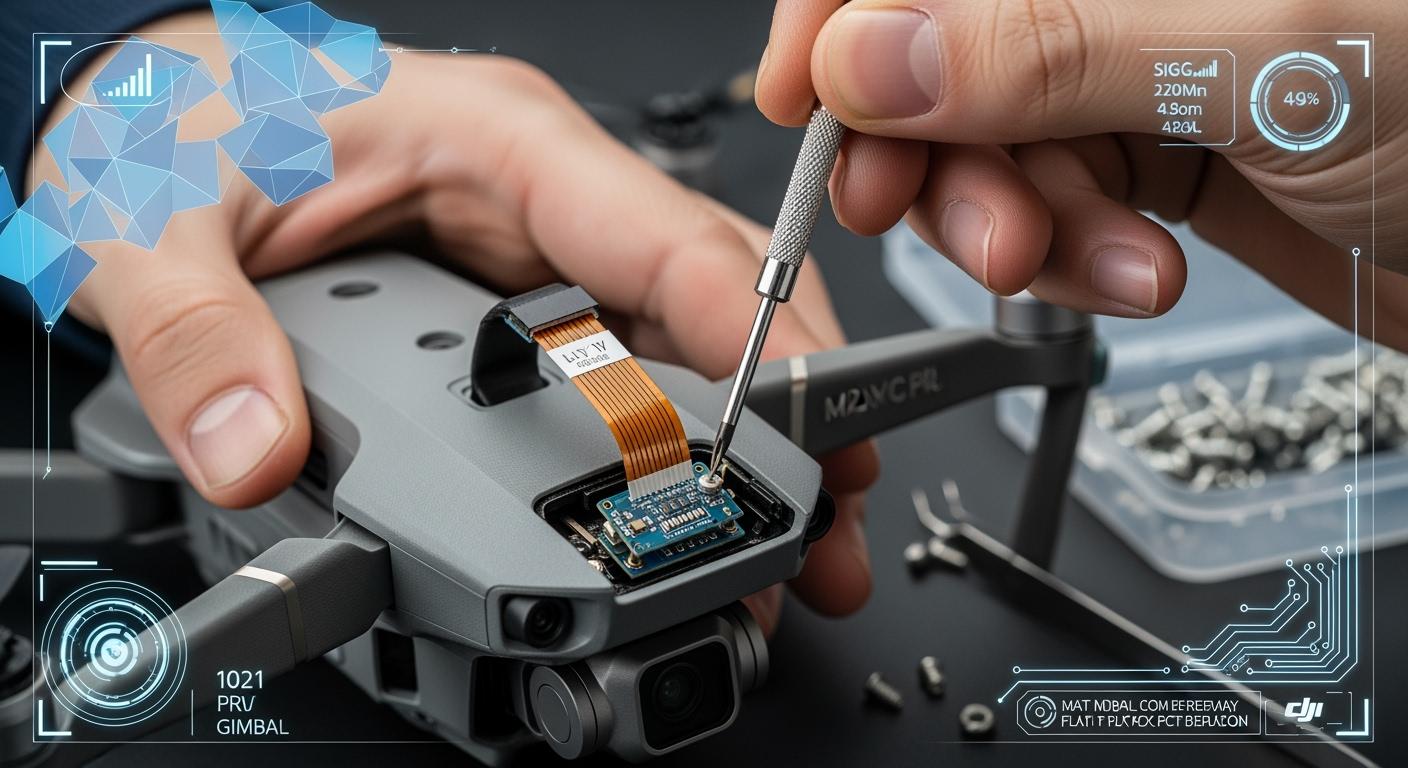
You will find that replacing the DJI Mavic Pro gimbal flat flex pcb often resolves issues such as gimbal overload, gyroscope errors, or persistent camera and gimbal malfunctions.
Tip: Remove the propellers and battery before you begin.
Set up your workspace with all necessary tools and parts. Work in a clean, organized area to protect delicate components. Read every step carefully and take your time for a successful repair.
Key Takeaways
- Always remove the propellers and battery before starting any repair. This prevents accidental power-ups and keeps you safe.
- Prepare your workspace with all necessary tools and parts. A clean and organized area helps avoid mistakes and protects delicate components.
- Handle all connectors and cables with care during the replacement process. Gentle handling prevents damage to sensitive electronics.
- Take photos during disassembly to remember where each part belongs. This makes reassembly easier and helps avoid confusion.
- Test the gimbal and camera functions thoroughly after reassembly. Ensure everything works correctly before your next flight.
Tools and Preparation For Flat Flex PCB
Before you start replacing the flat flex pcb in your DJI Mavic Pro, you need to gather the right tools and parts. Careful preparation helps you avoid mistakes and keeps your drone safe.
Tools Needed
You should collect all necessary tools before you begin. Here is a list to help you get ready:
- Precision Phillips screwdriver set
- Hex screwdriver (1.5mm or 2.0mm)
- Plastic pry tools or spudger
- Fine-tip tweezers
- Compressed air canister
- Small container for screws
- Anti-static wrist strap (optional, but recommended)
Tip: Use a magnetic mat or tray to keep screws organized and prevent loss.
Parts Checklist
You must have the correct replacement parts on hand. Double-check your list before starting the repair.
| Part Name | Quantity | Notes |
|---|---|---|
| Flat flex pcb | 1 | Ensure compatibility |
| Replacement screws | Optional | In case originals strip |
| Cleaning cloth | 1 | For dust removal |
If you order the flat flex pcb online, verify the part number matches your drone model.
Safety Precautions
Safety should always come first. Remove the propellers and battery from your drone before you do anything else. This step prevents accidental startup and protects you from injury.
Set up your workspace on a clean, flat surface with good lighting. Keep food and drinks away from your tools and drone. Wash your hands before handling any internal parts. If possible, wear an anti-static wrist strap to protect sensitive electronics.
Note: Take photos as you go. These will help you remember where each part belongs during reassembly.
By preparing your tools, parts, and workspace, you set yourself up for a smooth and successful flat flex pcb replacement.
Opening the Drone With Flat Flex PCB
Remove Propellers and Battery
Start by removing all propellers from your DJI Mavic Pro. Hold each motor firmly and unscrew the propellers one at a time. Place them in a safe container to avoid losing any parts. Next, slide the battery release buttons and lift the battery out of the drone. Set the battery aside in a secure spot.
Tip: Removing the propellers and battery prevents accidental power-up and protects you from injury during the repair.
Unscrew Upper Shell
You will need your precision screwdriver set for this step. Locate all screws on the upper shell of your drone. Most screws sit near the arms and under the stickers. Use a plastic pry tool to gently lift any stickers that cover screws. Place each screw in a small container or on a magnetic mat as you remove them.
Check the following areas for screws:
- Near each motor arm
- Under the rear arms
- Around the battery compartment
Take your time and make sure you do not strip any screws. If a screw feels stuck, apply gentle pressure and try a different screwdriver size.
Detach Shell Carefully
Once you remove all screws, use a plastic pry tool to separate the upper shell from the lower body. Start at one corner and work your way around the drone. Move slowly to avoid cracking the plastic. You may hear small clicks as the shell releases from the clips inside.
Lift the upper shell gently. Watch for any cables or connectors attached to the shell. If you see a cable, disconnect it carefully using tweezers. This step gives you clear access to the gimbal and the flat flex pcb inside your drone.
Note: Take a photo of the inside before you continue. This will help you remember where each cable and connector belongs during reassembly.
By following these steps, you prepare your drone for the next stage of the flat flex pcb replacement. Stay organized and patient to avoid damaging any components.
Accessing the Gimbal By Flat Flex PCB
Clean Gimbal Area
You need to keep the gimbal area clean before you handle any internal parts. Dust and debris can cause problems during the repair. Use a can of compressed air to blow away loose particles from the gimbal and surrounding components. Hold the can upright and spray short bursts to avoid moisture buildup.
Take a soft, lint-free cloth and gently wipe the gimbal arms and camera housing. Avoid using excessive force. If you see stubborn dirt, use a small amount of isopropyl alcohol on the cloth. Make sure the area dries completely before you continue.
Tip: Cleaning the gimbal area reduces the risk of static discharge and accidental damage to sensitive electronics.
Locate Flat Flex PCB
After cleaning, you need to find the flat flex pcb inside your DJI Mavic Pro. The flat flex pcb connects the gimbal to the main board. Look for a thin, flexible ribbon cable that runs from the gimbal assembly toward the main circuit board.
Follow these steps to locate it:
- Examine the area around the gimbal mount.
- Identify the ribbon cable with multiple gold contacts at each end.
- Trace the cable to its connectors on both the gimbal and the main board.
You may see the cable secured with small clips or adhesive. Take note of how the cable routes through the drone. You will need to install the new cable in the same way.
Note: Take a clear photo of the cable’s path and connectors. This reference will help you during reassembly.
Once you locate the flat flex pcb, you are ready to move on to the removal process. Careful observation and documentation at this stage will make the rest of the repair much easier.
Removing the Flat Flex PCB
Disconnect Ribbon Cable
You must approach this step with patience and a steady hand. The ribbon cable connects the gimbal to the main board and uses delicate connectors that can break if handled roughly. Follow these steps to disconnect the ribbon cable safely:
- Expose the two small ZIF (Zero Insertion Force) connectors near the front of the board. Remove any plastic coverings that protect these connectors.
- Use a nylon spudger to gently lift the locking tabs on each ZIF connector. Avoid using metal tools, as they can damage the contacts.
- Carefully slide the ribbon cable out of each connector. Hold the cable by its reinforced ends, not by the thin flexible part.
Tip: Take your time with the connectors. If you feel resistance, double-check that the locking tab is fully open before pulling the cable.
If a cable feels stuck, do not force it. Inspect the connector for any remaining adhesive or debris. Sometimes, a small amount of dust or glue can make removal difficult. Use a soft brush or compressed air to clear the area. If the cable still does not move, gently wiggle it side to side while applying minimal pressure.
Remove Old PCB
Once you disconnect the ribbon cable, you can remove the old flat flex pcb from the drone. The board may be secured with small screws or clips. Use your precision screwdriver to remove any screws, placing them in your parts container for safekeeping. If you encounter clips, release them gently with a plastic pry tool.
Lift the old pcb out of its slot. Avoid bending or twisting the board, as this can damage nearby components. If adhesive holds the pcb in place, apply gentle, even pressure to loosen it. Never use excessive force.
Note: If the pcb does not come out easily, double-check for hidden screws or clips. Take another look at your reference photos to ensure you have not missed anything.
Handle the removed pcb carefully. Place it on an anti-static mat or in a safe container. Inspect the area for any leftover debris or damage before proceeding to install the new part.
By following these steps, you protect the sensitive connectors and ensure a smooth transition to the next phase of your repair. Careful handling at this stage prevents costly mistakes and keeps your DJI Mavic Pro in top condition.
Installing the New Flat Flex PCB
Align and Connect PCB
You have removed the old board and prepared the area. Now, you need to install the new flat flex pcb. Start by comparing the new board with the old one. Check the connectors, shape, and contact points. This step helps you avoid mistakes during installation.
Hold the new board by its reinforced edges. Avoid touching the gold contacts. Align the board with the mounting points inside your drone. The connectors should face the same direction as before. Use your reference photos to guide you.
Gently slide the ribbon cable ends into the ZIF connectors. Make sure the cable sits straight and flat. If you feel resistance, stop and check the alignment. Forcing the cable can damage the contacts.
Tip: Use tweezers for better control when positioning the cable. This tool helps you avoid bending or creasing the ribbon.
Once the cable is in place, press down the locking tabs on the ZIF connectors. You should hear or feel a soft click. This sound means the connection is secure.
Secure Connections
After connecting the ribbon cable, you need to secure the new board. If your drone uses screws, insert them by hand first. Tighten them with a precision screwdriver. Do not overtighten, as this can crack the board or strip the threads.
If your model uses clips, press the board gently until you hear a snap. Double-check that the board sits flat and does not move. A loose board can cause connection problems later.
Inspect all connections. Make sure the ribbon cable follows the same path as before. The cable should not twist or stretch. Use a small piece of tape if needed to hold the cable in place, but avoid covering any contacts.
Note: Before closing the shell, check that no tools or loose screws remain inside the drone. A clean workspace prevents accidental damage during reassembly.
Take a final look at your work. Confirm that every connector is locked and every screw is tight. This careful inspection ensures your drone will function correctly when you power it on.
If you follow these steps, you will have a properly installed flat flex pcb. You are now ready to reassemble your DJI Mavic Pro and move on to testing.
Reassembly
Reattach Shell
Begin by aligning the upper shell with the lower body of your DJI Mavic Pro. Check that all internal cables sit properly and do not get pinched between the shells. Lower the shell gently, starting from the rear and moving forward. Press along the edges until you hear the clips snap into place. If you feel resistance, lift the shell slightly and check for misaligned parts or trapped wires.
Tip: Refer to your earlier photos to confirm cable positions before closing the shell.
Replace Screws and Propellers
Once the shell sits securely, locate the screws you removed earlier. Use your magnetic mat or container to find the correct screws for each location. Insert the screws by hand to avoid cross-threading, then tighten them with your precision screwdriver. Do not overtighten, as this can strip the plastic.
Follow this checklist for reassembly:
- Secure all screws around the arms and battery compartment.
- Reattach any stickers that cover screw holes.
- Install the propellers by matching each one to its correct motor. Push down and twist to lock them in place.
| Step | Action | Tool Needed |
|---|---|---|
| Insert screws | Hand-tighten, then secure | Precision screwdriver |
| Attach propellers | Align and lock into place | None |
Final Safety Check
Before you power on your drone, perform a thorough safety check. Inspect the shell for gaps or loose edges. Confirm that all screws are tight and all propellers spin freely. Check that no tools or foreign objects remain inside the drone.
⚠️ Note: Never skip the safety check. A missed step can cause damage during your first test flight.
If you followed each step, your DJI Mavic Pro should look as good as new. Take a moment to review your work. If you have questions or want to share your experience, leave a comment below. Your feedback helps others in the drone community!
Testing and Troubleshooting
Power On and Test Gimbal
After you finish reassembling your DJI Mavic Pro, you need to test the gimbal before your next flight. Insert the battery and power on the drone. Watch the gimbal as the drone starts up. The camera should move smoothly through its calibration sequence. You should not see any error messages on the controller or app.
Check these key functions:
- The gimbal moves up, down, left, and right without stuttering.
- The camera feed appears clear and stable in the DJI GO app.
- The gimbal responds to your remote control inputs.
Tip: Test all gimbal movements and camera angles while the drone sits on a flat surface. This step helps you spot issues early.
Troubleshoot Issues
If you notice problems, do not panic. Many issues have simple solutions. Use this checklist to guide your troubleshooting:
| Issue | Possible Cause | Solution |
|---|---|---|
| Gimbal does not move | Loose cable or connector | Reopen shell, check all connections |
| Gimbal overload error | Misaligned flat flex PCB | Reseat PCB, ensure proper alignment |
| Camera feed missing | Ribbon cable not fully seated | Disconnect and reconnect cable |
| Gimbal shakes or vibrates | Foreign object inside shell | Inspect and remove any debris |
If the gimbal still does not respond, power off the drone and double-check every connector. Make sure you did not miss a step during reassembly. Sometimes, a simple reseating of the ribbon cable fixes the problem.
⚠️ Note: Never attempt to fly if the gimbal or camera does not function correctly. Always resolve all errors before your next flight.
If you cannot solve the issue, consider reaching out to a professional repair service or the DJI support team. Sharing your experience in the comments can also help others who face similar problems.
You have now learned how to replace the DJI Mavic Pro gimbal flat flex PCB.
- Always remove the propellers and battery before starting.
- Keep your workspace clean and organized.
- Handle all connectors and cables with care.
Tip: Test every function before your next flight. If you feel unsure at any step or face issues, contact a professional.
Completing this repair yourself builds your skills and confidence. Share your experience or questions in the comments to help others in the drone community!
.png)
.png)
.png)
.png)

.png)

